MANUS Core 2.2 | FBX Data Export - Virtual Markers
Note: This article applies to both Prime 3 Haptic XR Gloves and Prime 3 Mocap Gloves
Note: This article applies to both Quantum Mocap Metagloves and Quantum XR Metagloves.
Introduction
MANUS Core Dashboard can export recordings as FBX.
One of the FBX export options added to MANUS Core 2.2 is the ability to generate "virtual markers" for the MANUS finger bones. These "virtual" finger markers can be used to combine with optical body markers and run a custom marker solve for the entire body, including the fingers.
Virtual markers can also be used to convert MANUS Polygon data to marker data, but this document will solely focus on finger data.
Exporting
Settings
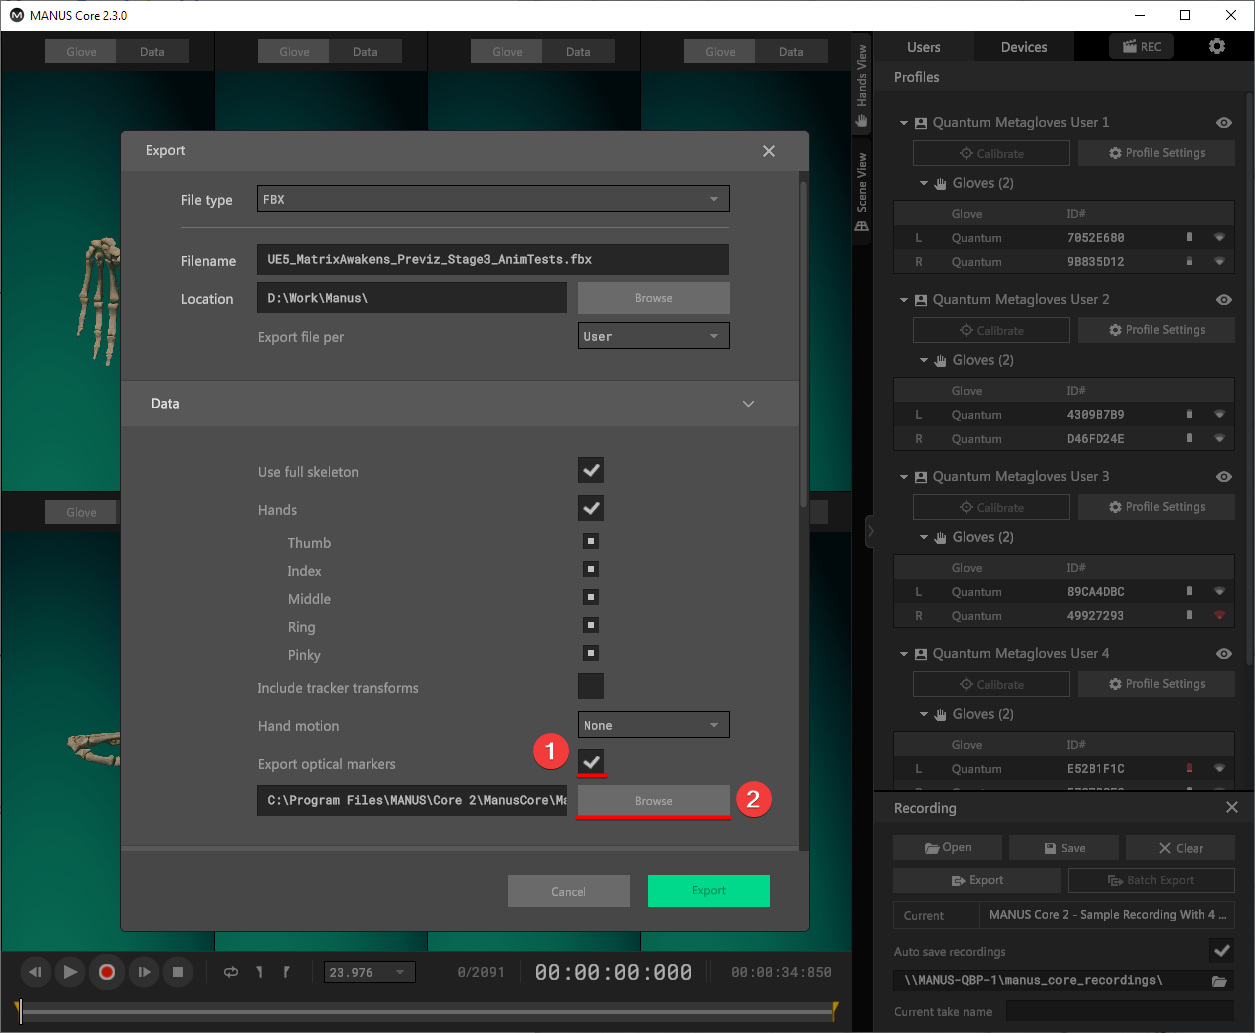
To export virtual markers, enable "Export optical markers" and select a marker preset:
Presets
MANUS Core Dashboard comes with 6 presets for virtual markers.
Preset Definitions
The marker presets are located in your MANUS Core 2 installation folder:
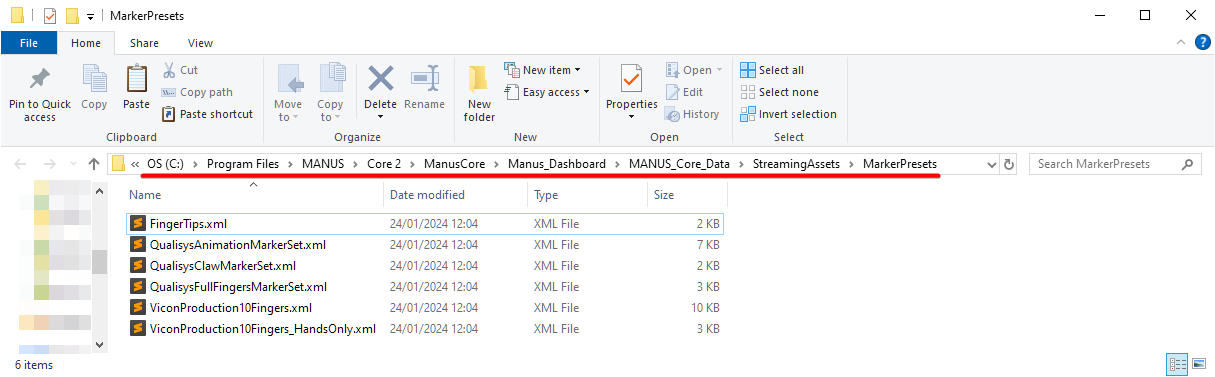
Typically the folder will be located in: "C:\Program Files\MANUS\Core 2\ManusCore\Manus_Dashboard\MANUS_Core_Data\StreamingAssets\MarkerPresets"
Make sure you have installed MANUS Core 2.2 or newer.
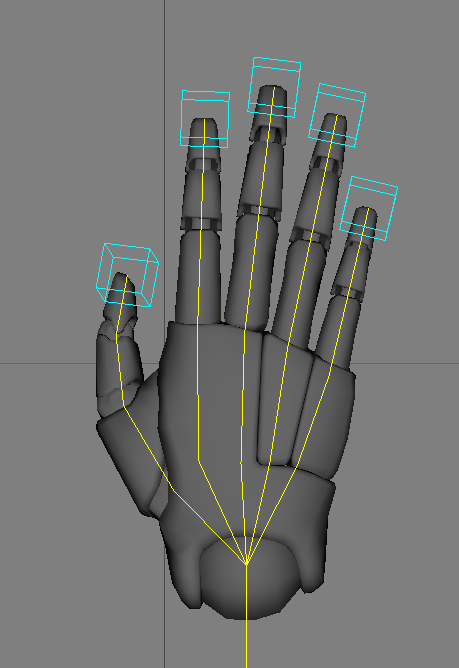
Fingertips
Virtual markers on the fingertips:
Qualisys Animation Marker Set
Virtual marker placement:
Qualisys Claw Marker Set
Virtual marker placement:
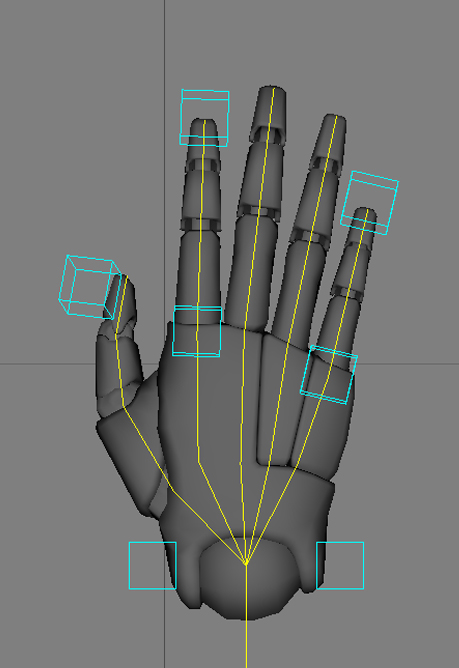
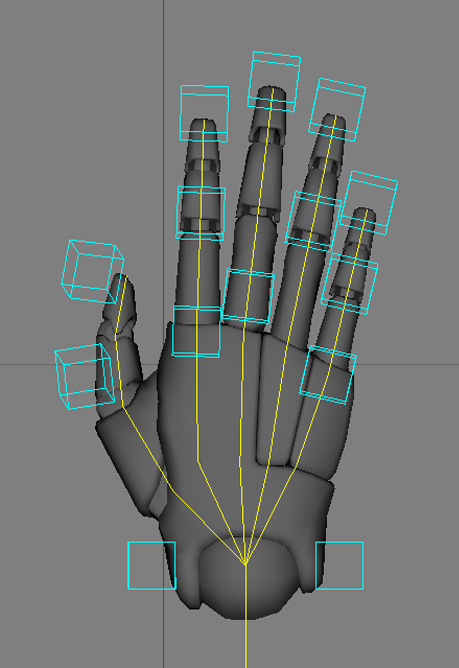
Qualisys Full Fingers Marker Set
Virtual marker placement:
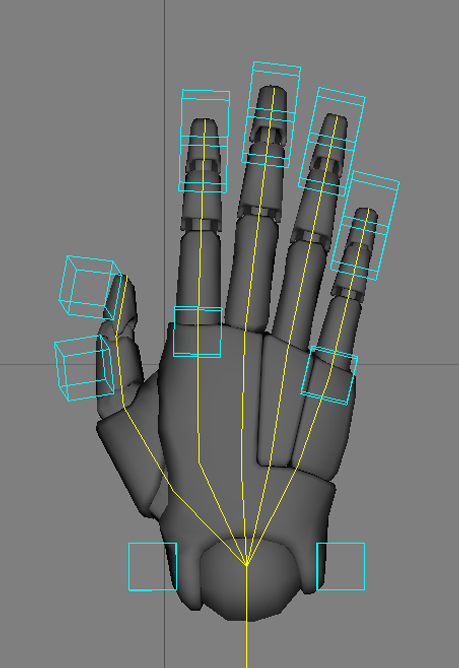
Vicon Production 10 Fingers
Virtual marker placement (with virtual body markers):
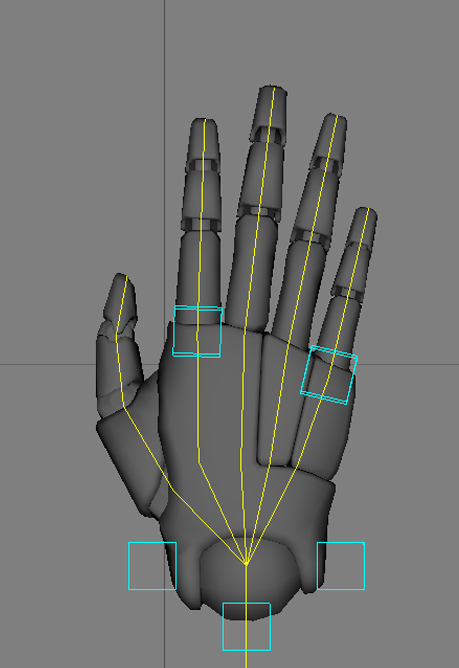
Vicon Production 10 Fingers (Hands Only)
Virtual marker placement (without virtual body markers):
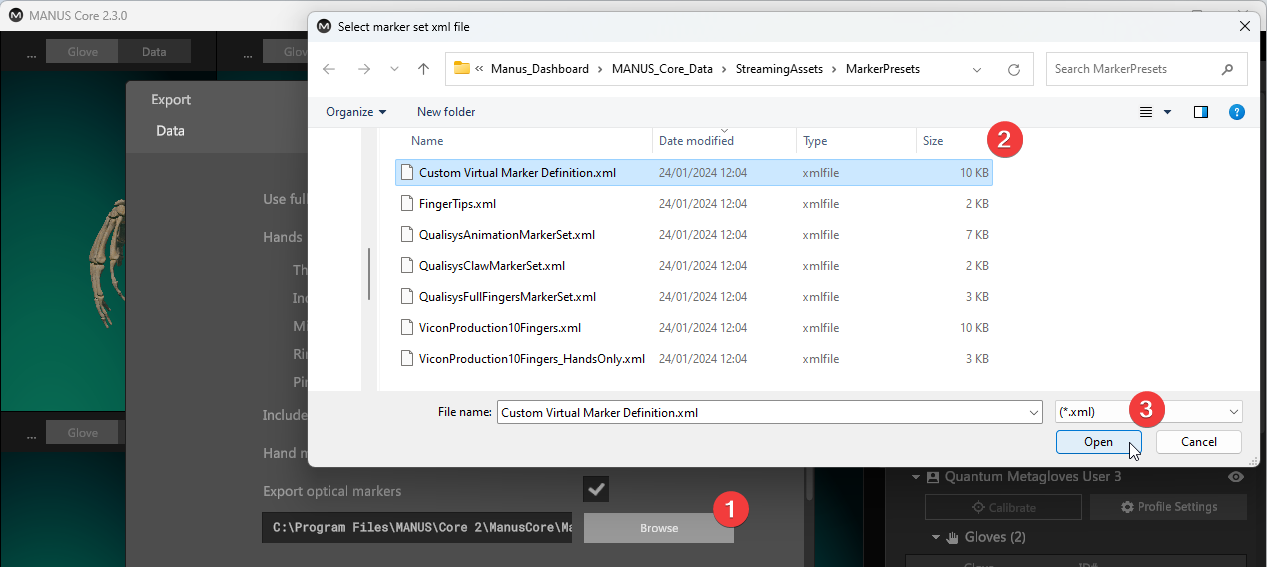
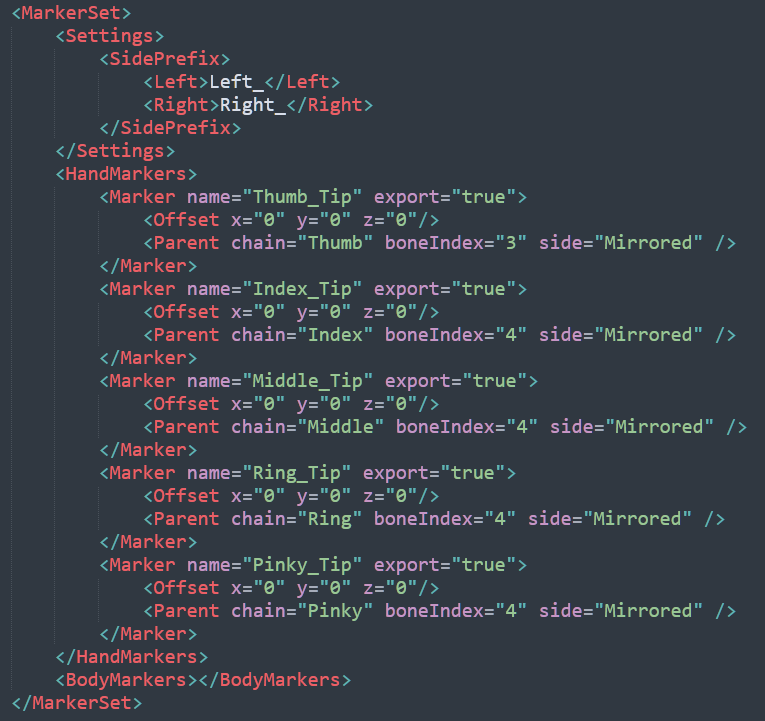
Importing Custom Definition
MANUS Core 2 allows you to import your own virtual marker export definitions.
Custom Virtual Marker Definitions are written in XML and can be selected from the export settings:
Creating Custom Definition
Virtual Marker Definitions are written in XML and can be customized to fit your needs.
The presets that come with MANUS Core 2 can be used as a reference, combined with the following information describing the file format.
Settings
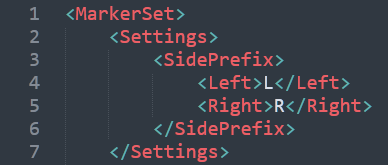
Side prefix
The side prefix adds a prefix to markers which are configured with their side set to “Mirrored”, “Left” and “Right”.
For example, "L" and "R" will be used as prefixes in this example:
Marker
Name
The name will set the name of the marker in the exported FBX file.
For markers with a side it will set the name to: [side prefix]+[marker name].
Export
The value for export can be “true” or “false”.
This value determines if the marker will be exported.
You can use this setting to temporarily disable exporting markers without deleting them.
Offset
The offset will move the markers relative to its parent.
The x, y and z values are in centimeters.
The general rule for the directions are:
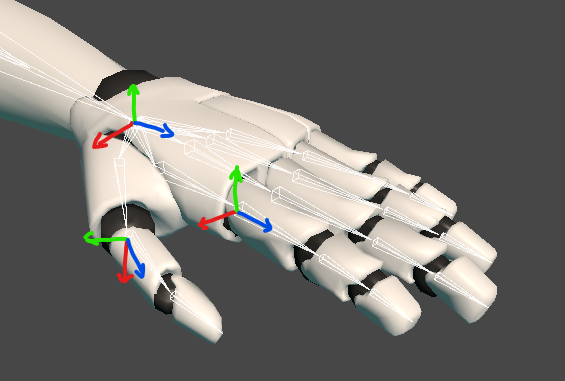
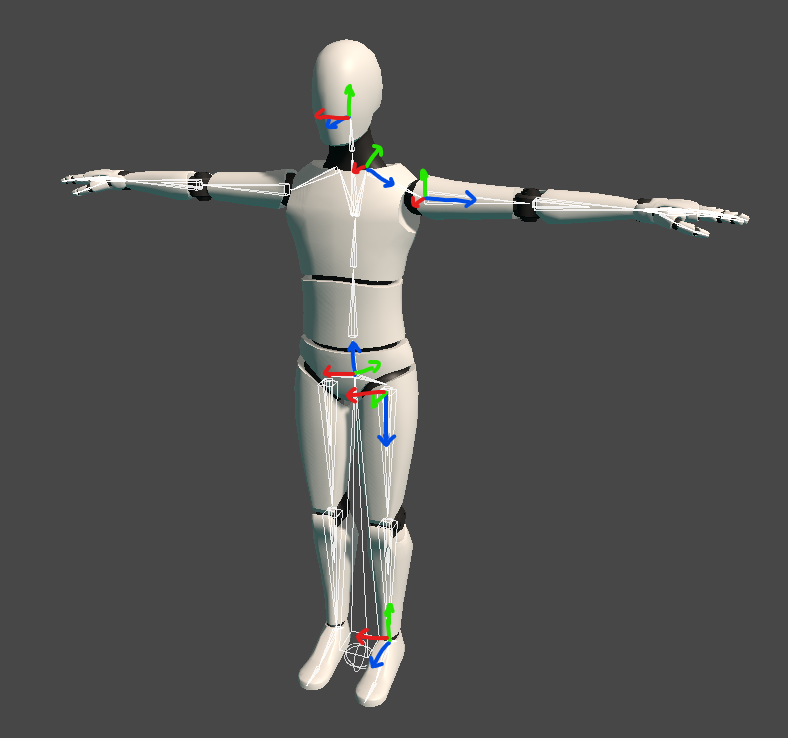
- Z (blue) is the forward direction, this is aiming at the next bone in the chain.
- Y (green)is the up direction.
- X (red) is the side direction, for chains on the right side this value is mirrored.
Example of 1.5cm offset in the (Y) up direction:

Bone orientation in the hands:
Bone orientation in the body:
Parent
The parent value determines what position marker will be following by combining the chain type, bone index, percentage and side value.
Chain
A marker can be assigned to a chain, which is a type of parent.
There are 14 different kind of chains.
Hand chains:
- Hand
- Thumb
- Index
- Middle
- Ring
- Pinky
Body chains:
- Head
- Neck
- Spine
- Leg
- Foot
- Toe
- Shoulder
- Arm
Example of a "Thumb" chain:

BoneIndex
The BoneIndex value refers to the number of a joint in a chain.
For example, for the "Arm" chain:
- 0 refers to the shoulder joint.
- 1 refers to the elbow joint.
- 2 refers to the wrist joint.
For the "Index", "Middle", "Ring" and "Pinky" chains:
- 0 refers to the CMC joint.
- 1 refers to the MCP joint.
- 2 refers to the PIP joint.
- 3 refers to the DIP joint.
- 4 refers to the fingertip.
For the "Thumb" chain:
- 0 refers to the CMC joint.
- 1 refers to the MCP joint.
- 2 refers to the IP joint.
- 3 refers to the fingertip.
Example of the thumb fingertip index:

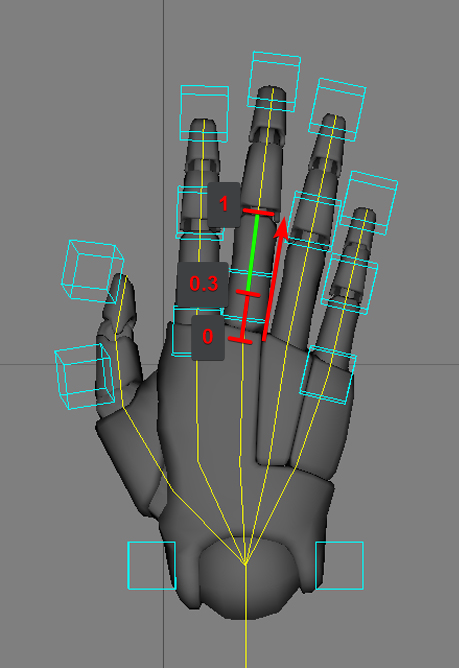
Percentage
The percentage represents the position of a marker along a chain.
"0" means the beginning of a chain, "1" means the end of a chain.
If the marker is placed at a certain percentage value, it signifies where it is located relative to the entire length of the chain.
When the percentage option is combined with the bone index option, it affects the placement of the marker within a specific range between bone indices.
In this case, a value of "0" for the percentage means the marker is positioned directly on top of the current bone index, while a value of "1" means it's positioned right on top of the next bone index.
Example placement of 0.3 between the middle finger MCP and PIP joint:

Example placement of 0.3 between the middle finger MCP and PIP joint:
Side
The side of the parent chain.
Options:
- Center, apply markers to center chains ("Head", "Spine" and "Neck")
- Left, apply markers to the chains on the left side ("Arm", "Hand", "Index", etc.)
- Right, apply markers to the chains on the right side ("Arm"”, "Hand", "Index", etc.)
- Mirrored, apply markers to both left and right chains ("Arm", "Hand", "Index", etc.)
Example of a center sided chain:

Example of a mirrored (left and right) chain:

Example of a left chain:

Example of a right chain:

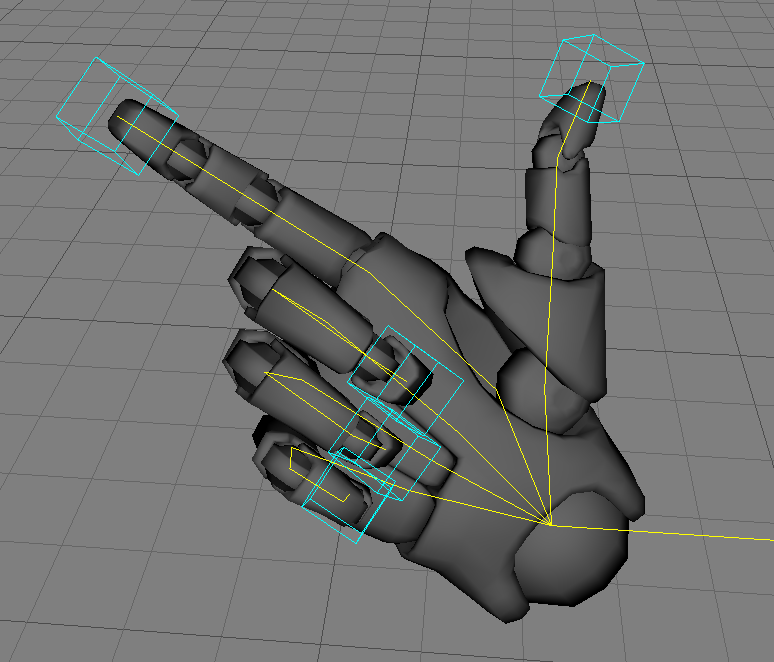
HandMarkers
All markers with parent chain type "Hand", "Thumb", "Index", "Middle", "Ring" or "Pinky" are hand markers.
Example of hand markers:
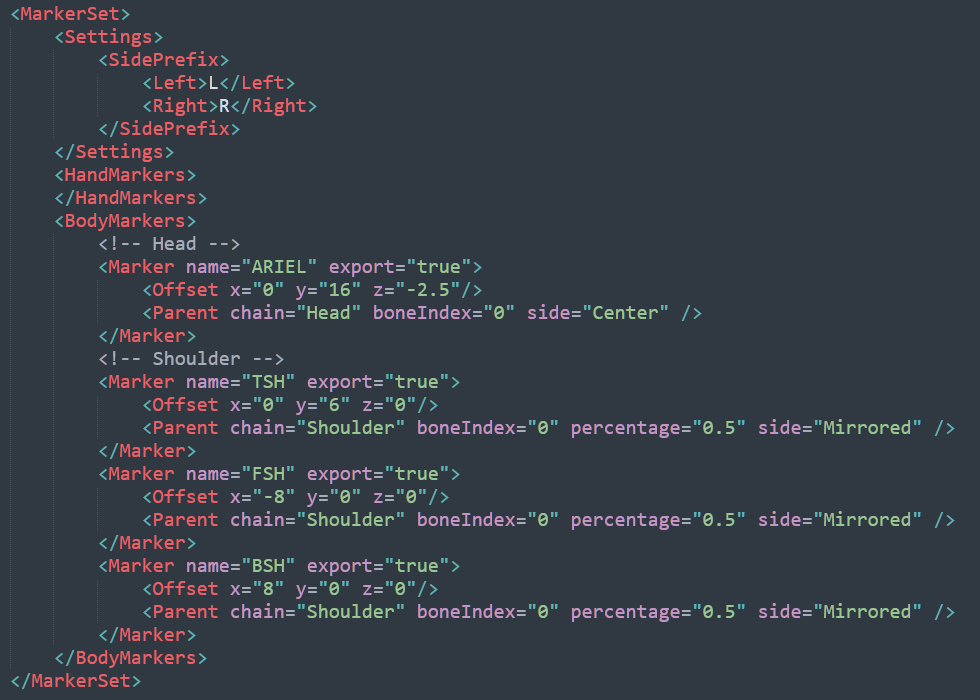
BodyMarkers
All markers with parent chain type "Head", "Neck", "Spine", "Leg", "Foot", "Toe", "Shoulder" or "Arm" are body markers.
Example of body markers: